Skip to content

活动

Simple AI exercise timer

中级 | MakeCode | 加速计 | Collecting data, Human role in AI design, Understanding AI, 机器学习组件

A great first project to build with micro:bit CreateAI. Make a smart exercise timer that can tell how long you’re active or inactive.

Step by step project guide

Step 1: Understand it

工作原理?

In this project you’ll train a machine learning (ML) model to recognise when you’re exercising and when you’re not exercising.

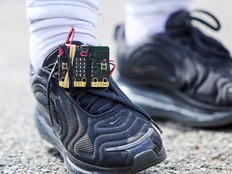
You’ll combine that model with a MakeCode program to make an exercise timer and put this project on your BBC micro:bit. Simply wear the micro:bit to time how long you've been exercising or not exercising.

Press button A to see how many seconds you’ve been active, and B to see how long you’ve been inactive.

What is machine learning?

Machine learning (ML) is a kind of artificial intelligence (AI) where computers can learn from and make decisions based on data.

ML models are trained by humans to help them make those decisions, for example, to recognise different ‘actions’ when you move your micro:bit in different ways.

What will I need to do?

AI systems need humans to design, build, test and use them. You'll collect data to train an ML model, test it, improve it and combine it with computer code to make a smart device that uses AI. You'll use a micro:bit and the micro:bit CreateAI website to do this.

Step 2: Create it

所需材料

Collect data samples

When you open the project in micro:bit CreateAI, you’ll see we’ve given you some data samples for ‘exercising’ and 'not exercising’ actions:

You will add your own movement samples using the micro:bit's movement sensor, or accelerometer.

In micro:bit CreateAI, click the 'Connect' button to connect your data collection micro:bit and follow the instructions.

Attach the data collection micro:bit to your wrist. Decide on some actions that are often part of exercising e.g. running on the spot, star jumping, or walking. Click on the first action, ‘exercising’ and click 'Record' to record your own data samples. If you make a mistake, you can delete any samples you don’t want. You can also press button B on the micro:bit to start recording.

Do the same for the ‘not exercising’ action making sure you collect samples in different orientations.

Examine the data samples: do all the ‘exercising’ samples look like you are moving? Do all the ‘not exercising’ samples look like you are still?

Train and test the model

Click the ‘Train model’ button to train the model, then test it. Try moving around and see if ‘exercising’ is shown as the estimated action. Keep still and see if ‘not exercising’ is estimated. Give your micro:bit to someone else to wear and see if it works as well for them.

Improve your model

Most models can be improved with more data. If the model needs improving to recognise your actions, click on ‘← Edit data samples’.

You can delete any data samples which you think don’t fit (because they look completely different from other samples for the same action) or add more samples from yourself and other people.

Train the model again, and test it again.

Put the model and code on your micro:bit

In micro:bit CreateAI click on ‘Edit in MakeCode’ to see the project code in the MakeCode editor.

You can modify the code just like you would in any micro:bit MakeCode project, or just try it out as it is. Attach a micro:bit using a USB data cable, click on the ‘Download’ button in the MakeCode screen and follow the instructions to transfer your AI model and the code blocks to a micro:bit. Unplug the micro:bit, attach a battery pack, wear it and test it.

  • Press button A to see how many seconds you have been exercising.
  • Press button B to see how many seconds you have not been exercising.
  • Reset the timer by pressing the reset button on the back of the micro:bit, or disconnecting and reconnecting the battery pack.

How the code blocks work

The code uses two variables to keep track of how long you've been exercising and not exercising. When the program first runs it sets these timer variables to 0.

The 'on ML... start' blocks are triggered when the ML model decides you have started either exercising or not exercising. They show different icons on the micro:bit's LED display depending on the action it has estimated you are doing.

The 'on ML... stop' blocks are triggered when the ML model decides you have finished an action. Code inside each block clears the screen and adds the duration of the action that has just finished to the variable storing the total time for each action.

The 'on button... pressed' blocks contain code to display the variables showing the total time you have been exercising and not exercising. The timer counts in milliseconds (thousandths of a second) so the number shown is divided by 1000 to show total durations in seconds.

Evaluation

How accurate is it at measuring how long you’ve been exercising or resting? Does it work equally well for different people?

Test if the timer code is working well with the model in three easy steps:

  1. Press the reset button.
  2. Exercise for 30 seconds.
  3. Press button A. You should see a number close to 30 scroll across your display.
  • If you want to improve the model, click the < arrow at the top left of the MakeCode editor to add more data samples and retrain the model.

Compare the Simple AI exercise timer with the Step counter project that does not use ML (machine learning):

  • How does using ML create a more useful project?
  • Is AI / ML always needed to make useful projects?

Step 3: Extend it

  • Explore adding code blocks that show a '?' when the model cannot identify your action.
  • Add sound blocks to give audio feedback when exercising or not exercising are detected.
  • Try out the AI activity timer project to train your micro:bit to detect and time specific exercises or activities.